Hello,
One of my questions includes an image similar to the one on the left of the attachment ("Initial image").
The question type is not hotspot: respondents are asked to choose a number between 0 and 10. Depending on their choice, I want to "grey out" a certain area of the picture, i.e. everything to the left and above the n-th ball, where n is the number between 0 and 10 which they chose. This should happen before they submit their answer, and they should be able to play with different values and see what happens before submitting their answer.
I'm assuming this can be done using a filter in JavaScript, but I'm not sure how to do it. I do not wish to call the already greyed-out images from the Gallery: this is because the "Initial images" are more complex and too many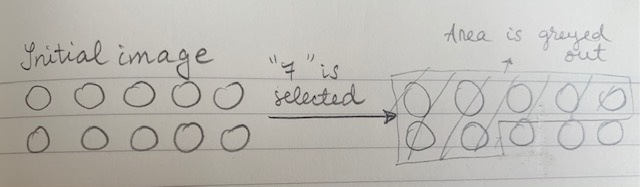 , while the size of the greyed out area always varies with the respondents' input, regardless of the image under this filter.
It seems that what I want to do is similar to a graphic slider, in that the image adjusts to participants' input: however, I can't use a slider, as I need more complex background images.

Grey out part of an image on event
Best answer by nicolaigeburek
Hi there!
I found a solution for this. You can add the below custom JavaScript code to the 'addOnLoad()' function to any questions on the page.
You will have to find your input elements (input field where users enter the number) and your output element (the parent div of your image) in the html DOM (dev tools --> inspect, depends on browser) and replace it with the elements from my example in line 1 and 2.
Hope this helps!
BR, Nico
inputElement = document.getElementsByTagName("input")[0];
outputElement = document.getElementsByClassName("QuestionBody")[4];
//event listener so function is being called with every change in input field
inputElement.addEventListener("keyup", updateImage);
//new wrapper div is created and appended to image
var newDiv = document.createElement("div");
newDiv.style.position = "absolute";
newDiv.style.height = "100%";
newDiv.style.width = "100%";
newDiv.style.top = "0";
newDiv.style.left = "0";
newDiv.style.display = "flex";
newDiv.style.flexDirection = "row";
newDiv.style.justifyContent = "flex-start";
newDiv.style.alignItems = "flex-start";
newDiv.style.flexWrap = "wrap";
outputElement.appendChild(newDiv);
//10 new divs are created and appended to newly created wrapper div
var newDivInside = document.createElement("div");
newDivInside.style.display = "none";
newDivInside.style.height = "50%";
newDivInside.style.width = "20%";
newDivInside.style.backgroundColor = "rgba(0,0,0,.5)"; //modify color/transparency here
newDivInside.className = "myInsideDivs";
for (i = 0; i < 10; i++) {
newDiv.appendChild(newDivInside.cloneNode(true));
}
//function to update the image
function updateImage () {
//hide all inside divs
listOfInsideDivs = document.getElementsByClassName("myInsideDivs");
for (i = 0; i < listOfInsideDivs.length; i++) {
listOfInsideDivs[i].style.display = "none";
}
//show n divs
for (i = 0; i < inputElement.value; i++) {
listOfInsideDivs[i].style.display = "flex";
}
}

Sign up
Already have an account? Login

Welcome! To join the Qualtrics Experience Community, log in with your existing Qualtrics credentials below.
Confirm your username, share a bit about yourself, then you're ready to explore and connect .
Free trial account? No problem. Log in with your trial credentials to join.
No free trial account? No problem! Register here
Already a member? Hi and welcome back! We're glad you're here 🙂
You will see the Qualtrics login page briefly before being taken to the Experience Community.
Login with Qualtrics
Welcome! To join the Qualtrics Experience Community, log in with your existing Qualtrics credentials below.
Confirm your username, share a bit about yourself, then you're ready to explore and connect .
Free trial account? No problem. Log in with your trial credentials to join. No free trial account? No problem! Register here
Already a member? Hi and welcome back! We're glad you're here 🙂
You will see the Qualtrics login page briefly before being taken to the Experience Community.
Login to the Community
No account yet? Create an account
Welcome! To join the Qualtrics Experience Community, log in with your existing Qualtrics credentials below.
Confirm your username, share a bit about yourself, then you're ready to explore and connect .
Free trial account? No problem. Log in with your trial credentials to join.
No free trial account? No problem! Register here
Already a member? Hi and welcome back! We're glad you're here 🙂
You will see the Qualtrics login page briefly before being taken to the Experience Community.
Login with Qualtrics
Welcome! To join the Qualtrics Experience Community, log in with your existing Qualtrics credentials below.
Confirm your username, share a bit about yourself, then you're ready to explore and connect .
Free trial account? No problem. Log in with your trial credentials to join. No free trial account? No problem! Register here
Already a member? Hi and welcome back! We're glad you're here 🙂
You will see the Qualtrics login page briefly before being taken to the Experience Community.
Enter your E-mail address. We'll send you an e-mail with instructions to reset your password.