


Table of contents
Introduction
Supplemental Data Sources (SDS) are going through a major update while we prepare to make the feature generally available. This post details what is changing and how to migrate legacy SDS integrations to the new SDS implementation.
What is changing?
Key changes include the location of where the SDS sources are stored/managed and the size/usage limits. SDS will be managed and shared via the Library rather than through Data & Analysis on Imported Data and Survey Projects. Limits are listed below:
| Name | Limit | Notes |
| Max SDS sources per brand | 200 SDS Sources | |
| Max SDS size | 10 MB | |
| Max records per SDS | 100,000 records | At least one search field per record must have a value. |
| Max fields per record | 30 fields | |
| Max field size | 200 bytes / characters | |
| Max non-search field size | 5,000 bytes / characters | |
| Max usage rate (Brand) | 30 requests per minute | For creating and updating sources. |
| Max usage rate (User) | 10 requests per minute | For creating and updating sources. |
What is the timeline?
- November 30, 2023: An email was sent to Brand Admins detailing the migration, along with projects that use legacy SDS.
- February 29, 2024: Implementations on legacy SDS will no longer function as expected and should be migrated to the new SDS.
What action do I need to take?
If you are using legacy SDS, you will need to take action to migrate existing integrations or they will no longer function as expected.
- [Required] Enable permissions for users and groups who need access.
- [Required] Migrate legacy SDS sources from Imported Data and Survey Projects to the Library.
- [Required] Migrate Survey Flow elements.
- [Required] Migrate Autocomplete questions in surveys.
- [Required] Migrate Lookup Tasks in Workflows.
- [NEW-Optional] Setup automatic updates for a new SDS using the Load to SDS Task in workflows.
What alternatives exist?
Due to the limits on the new SDS, migration may look different for each use case. Below is a list of our current recommendations based on use cases we’ve seen.
- I want to enrich my response data for use in reporting and dashboarding. I do not need this data during survey taking (i.e. for logic or piped text).
- If you don't need the lookup data during survey taking, you are performing a JOIN and should look into onboarding onto the Data Modeler. SDS will not support storing embedded data via Survey Flow beyond the maximum of 30 fields.
- I want to perform lookups against XMD contact data during survey taking.
- Use the fully launched and supported XM Directory features. XMD supports authenticator lookups allowing XMD data to be pulled into a survey.
- I want to perform lookups against person data during survey taking.
- Use EX authenticators for accessing person data.
Enabling permissions
SDS permissions are not enabled by default for all users. Brand Admins can follow the below instructions to enable permissions for users and groups
| Note: Once permissions are enabled, it can take several minutes to percolate through the system. If the user does not have access immediately, check again later. |
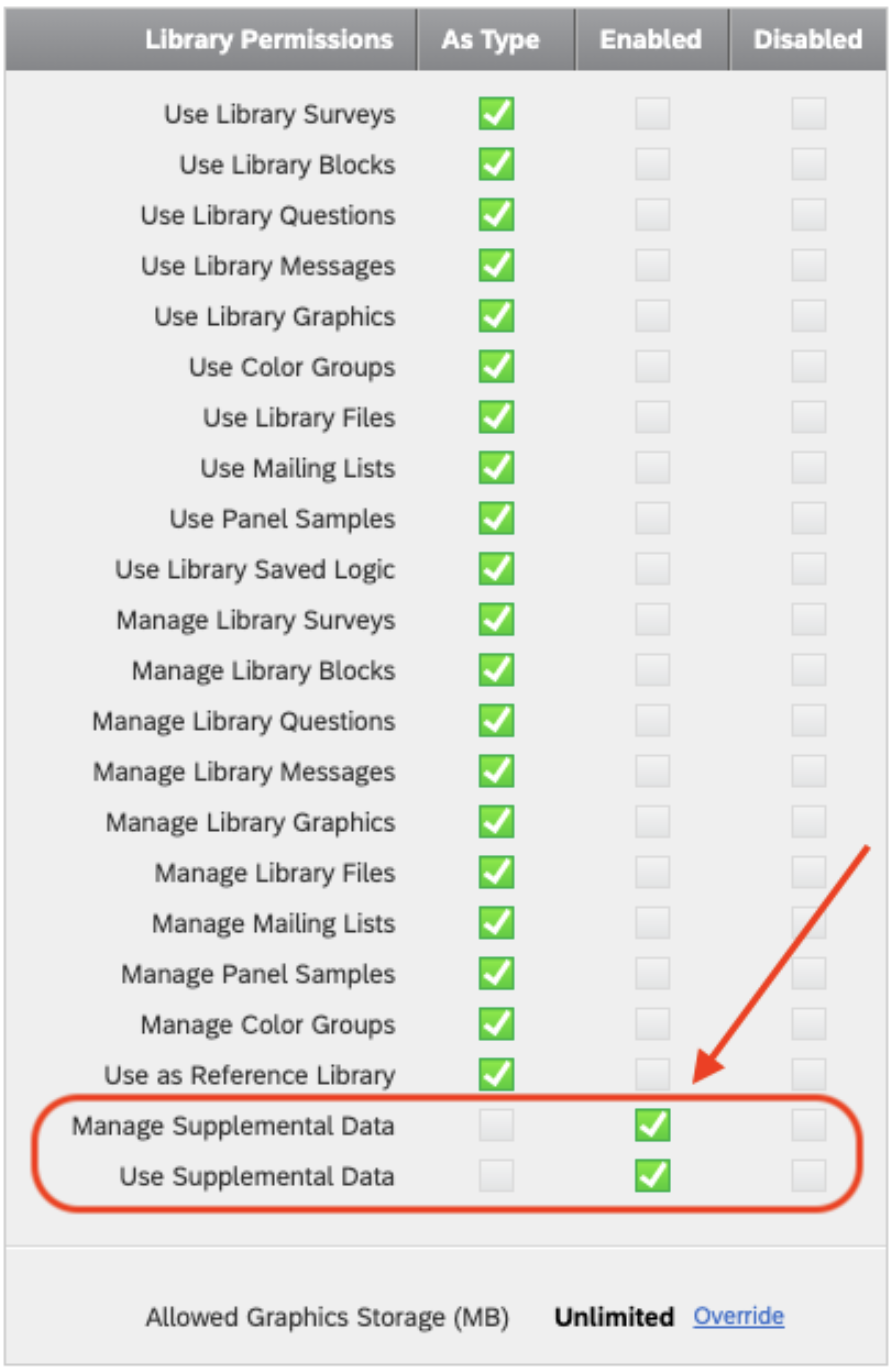
- Verify that the Autocomplete with Supplemental Data permission is enabled. This should already be enabled for everyone by default, but it’s possible that permissions were changed. These are required in order to use SDS and with Autocomplete questions.
- For users:
- Navigate to Admin → Users
- Search for the user you want to enable the permissions for and open user settings.
- Enable Manage Supplemental Data and Use Supplemental Data and save.
- For groups:
- Navigate to Admin → Group Types.
- Search for the group type associated with groups you want to give access and open group settings.
- Enable Manage Supplemental Data and Use Supplemental Data and save
- For users:


Migrate supplemental data sources to the library
Prior to migrating Survey Flow, Autocomplete, etc., you will need to migrate the datasets that these features consume from the legacy SDS from Data & Analysis to the new SDS implementation in the Library.
- You should have received a list of recently used projects that use Supplemental Data Source for Autocomplete or Survey Flow in an email from Qualtrics or your XM Success Manager.
- Identify the dataset that is being used as Supplemental Data Source.
- Export Imported Data Projects to CSV or TSV. If you already have access to your original dataset in CSV or TSV format, you may skip to step 4 to upload your dataset as a new Supplemental Data Source.
Note: If there are impacted projects that are inactive or you no longer use, you can feel free to disregard migrating these. It is up to you which projects should be migrated. Note, however, that any projects that are not migrated will not work as expected once legacy supplemental data sources are no longer supported.
Note: Setting up supplemental data sources from response data on another survey is no longer supported. To accomplish similar functionality, you may export response data and import as a supplemental data source.
- Navigate to Projects.
- Select the Imported Data Project or Survey Project that contains your Supplemental Data Source.
Tip: Use the search field to find impacted projects. You can enter the survey name or search by survey ID.
- If within a Survey Project, navigate to the Data & Analysis tab. Take note of the search fields that are being used.
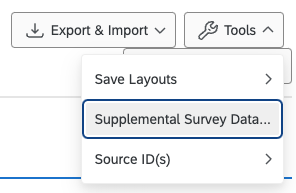
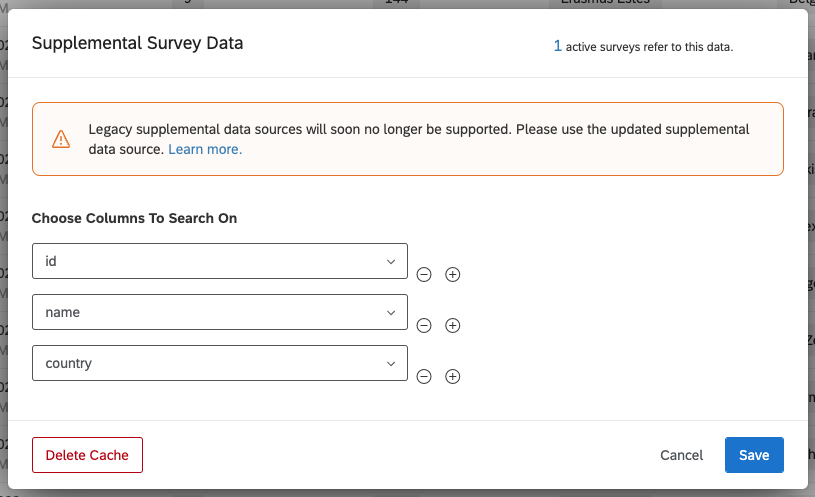
- Select Tools → Supplemental Survey Data…
- Take a screenshot or take note of the search fields. You will need this when setting up the new Supplemental Data Source
- Select Tools → Supplemental Survey Data…
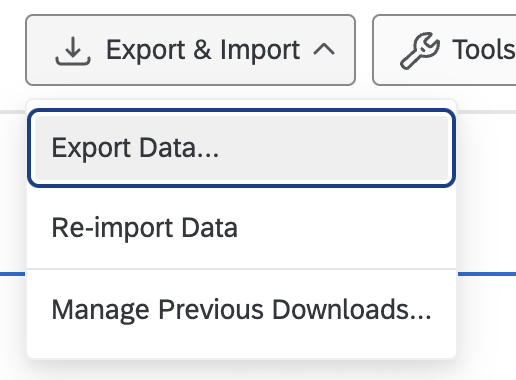
- Select Export & Import → Export Data…
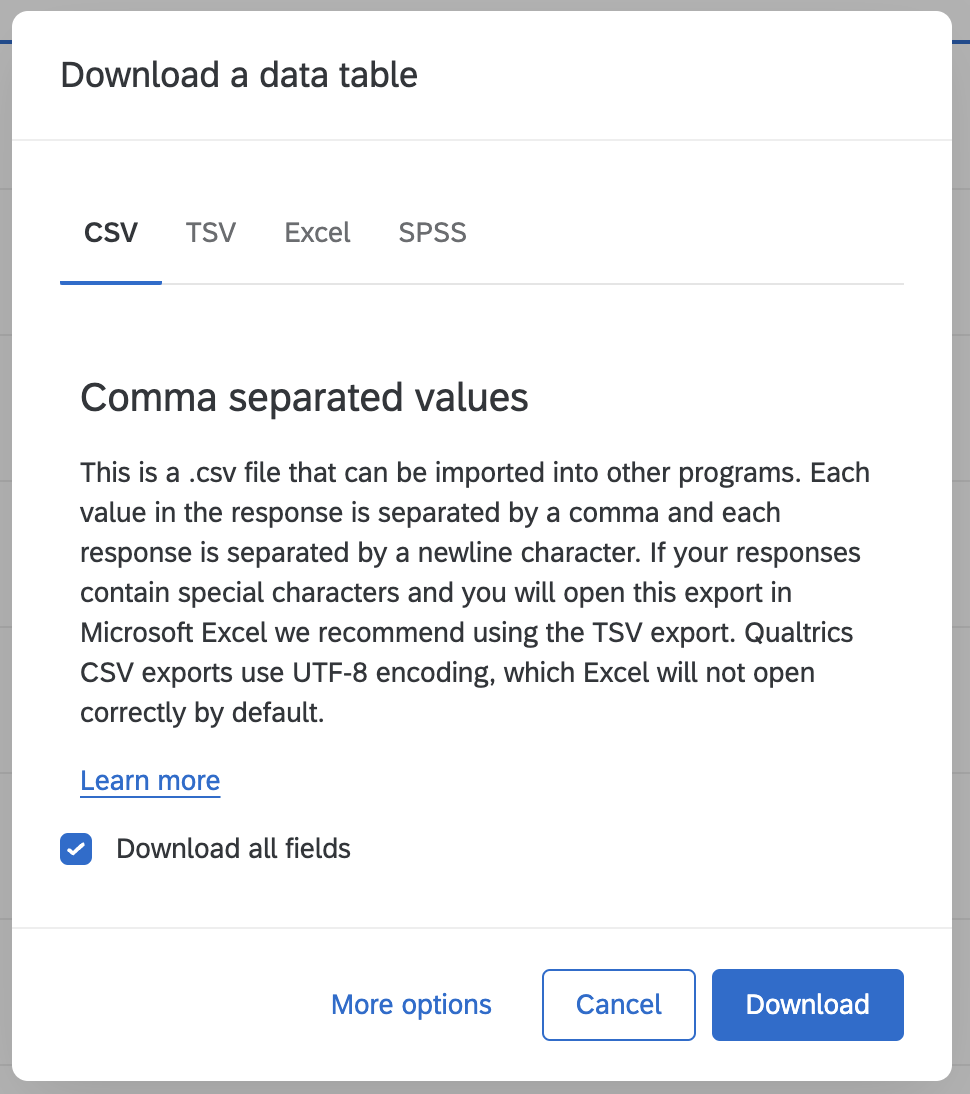
- Select to export as either CSV or TSV
- Select Download
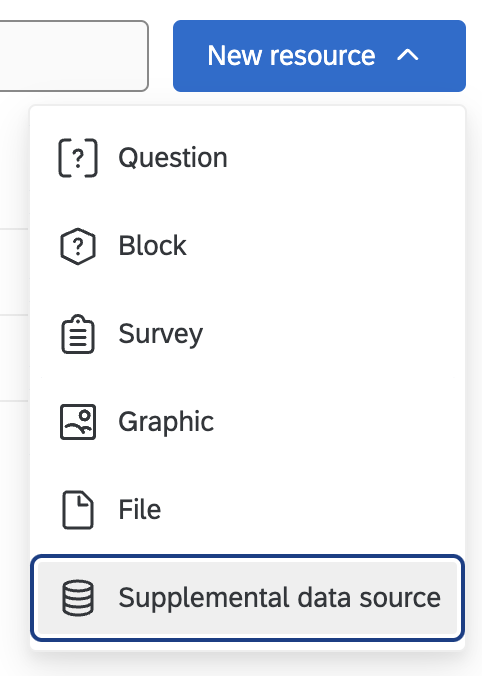
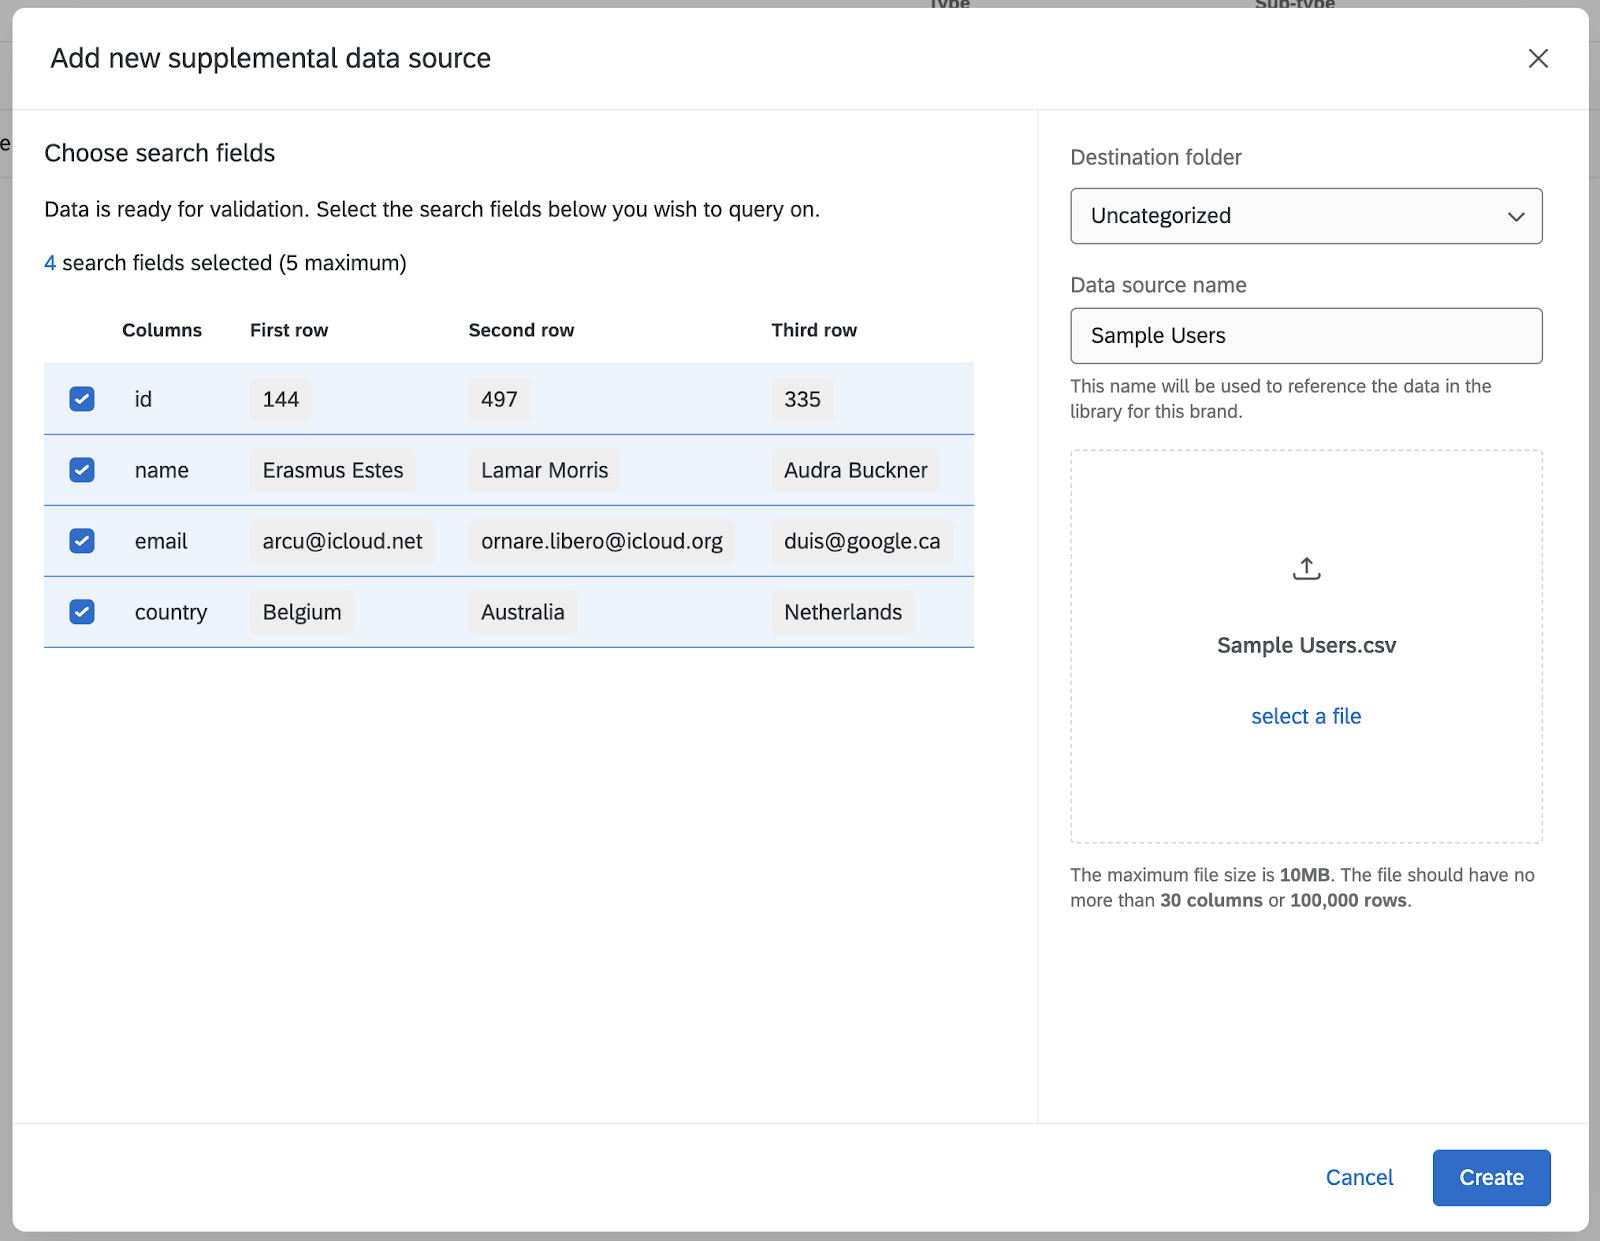
- Create a new Supplemental Data Source
- Navigate to the Library or the autocomplete question or survey flow element in survey flow.
- If necessary, trim down the dataset to be less than 100,000 rows, 30 columns, and 10MB file size. Note that any selected search fields must be fully populated in the dataset, otherwise those records cannot be indexed and will not be used for searching.
Note: If you want to share the SDS with other users, be sure to create it in a group Library. See more info under Sharing.
- In library select New resource → Supplemental data source
- Select a file, name the data source, and select up to 5 search fields. You will want to use the same search fields from your previous SDS source in order to ensure active projects referencing the supplemental data source continue to work as intended (see step 1).
- Select Create
- Your Supplemental Data Source is now ready to be used!
Sharing
Legacy sources operated with project sharing. Sources are now managed in the Library. To share a source, create or move it to a group library. All users in the group will then be able to access the source. For additional guidance on library sharing, see Groups.
Migrate Survey Flow
- Navigate to Projects.
- Select a survey using the legacy Supplemental Data Source in Survey Flow.
Tip: Use the search field to find impacted projects. You can enter the survey name or search by survey ID.
- Navigate to Survey Flow.
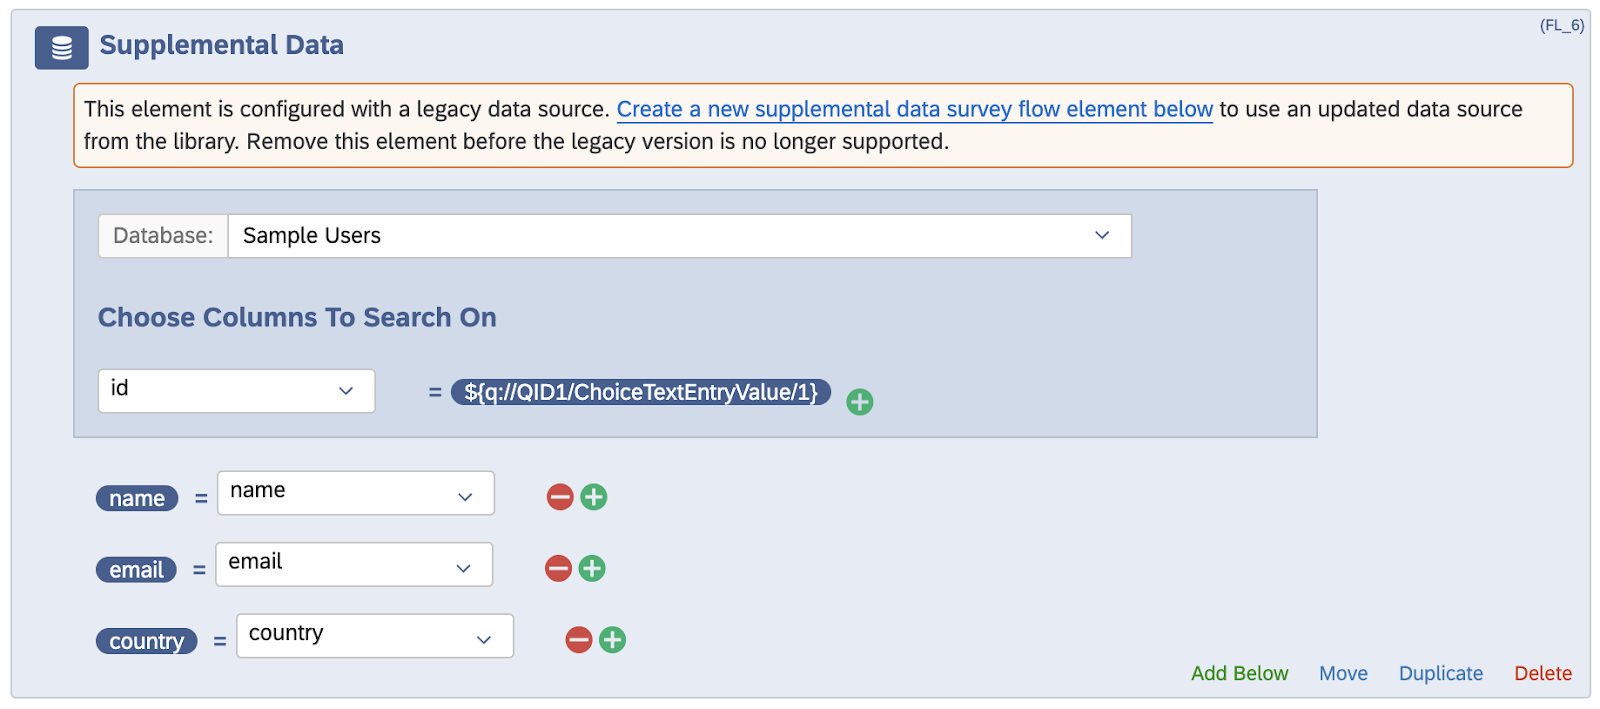
- Notice the banner at the top describing the change. Selecting these elements will show you which survey flow elements are using legacy supplemental data sources. Each element will also have a banner, making it apparent which ones are impacted.
Tip: Toggle Show flow IDs at the top-right to display the flow ID at the top-right corner of each element. You can then use your browser’s search functionality to quickly find the impacted elements.
- From the banner in the survey flow element using a legacy supplemental data source, select Create a new supplemental data survey flow element below. A new element will be created directly below.
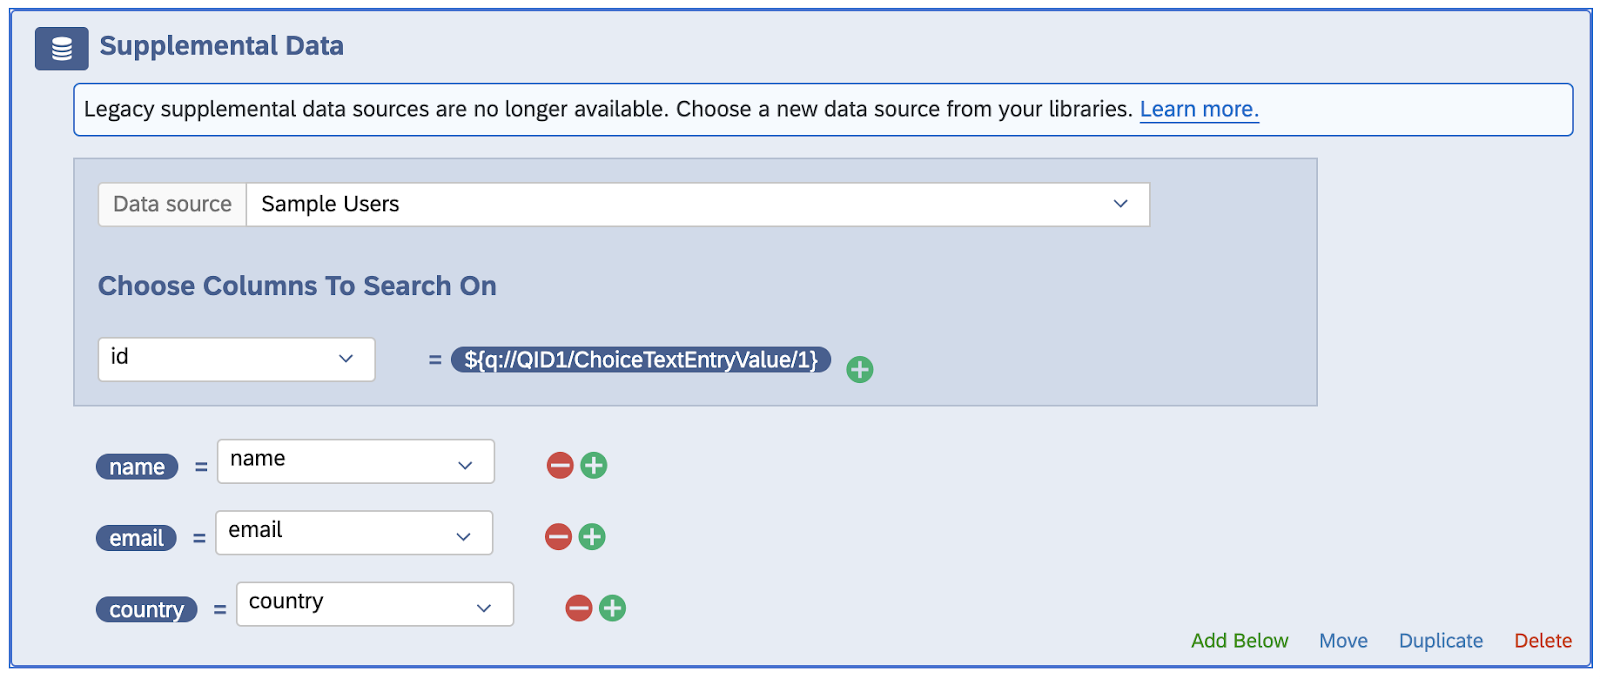
- Comparing with the existing survey flow element, update the new element to match your use case with a new supplemental data source, selected from your library. In some cases, you may need to modify which embedded data fields are used and which columns are being searched on. This is particularly true when you’ve needed to modify a legacy data source to fit within the new limits.
Note: All conditions must match a record in the data source.
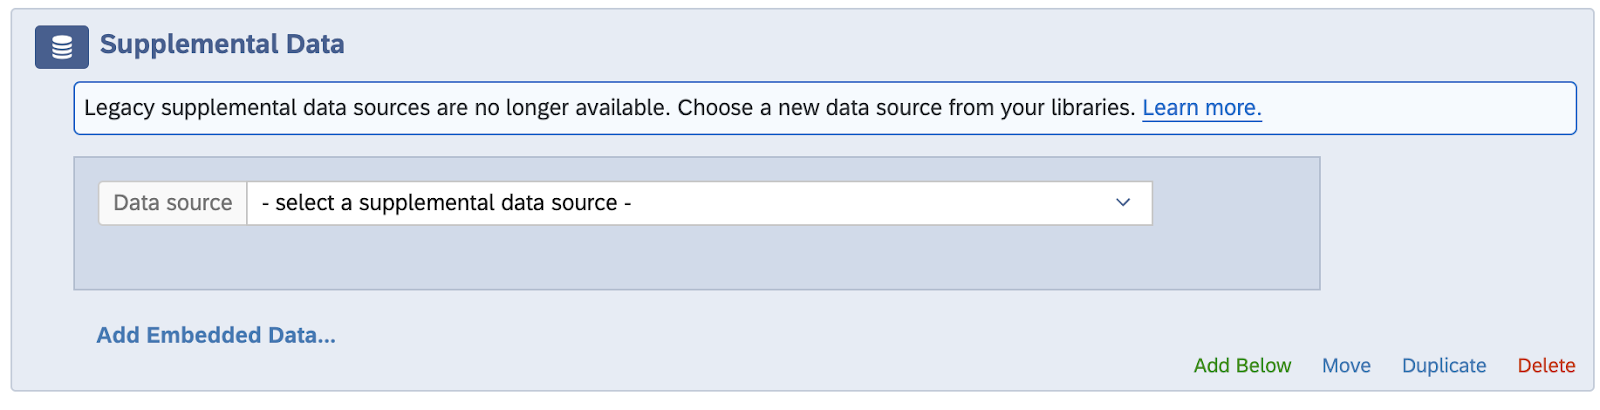
- Delete the survey flow element that used the legacy supplemental data source (with the orange warning banner indicating the switch).
- You can verify that you have finished migrating all your survey flow elements once the banner at the top from step (4) is no longer showing.
- Select Apply to save changes.
- Preview the impacted survey and verify everything works as you expect.
- Publish the updated survey.
Tip: The supplemental data source can be created on the fly from within autocomplete or survey flow by using the “Create new supplemental data source” option in the source selection dropdowns. See the full instructions to migrate those features below.

Migrate Autocomplete
Warning: In order to maintain reporting data in dashboards and other survey configuration, it is important that you do not delete the old autocomplete questions and create new ones. Instead, we have provided a convenient way for you to migrate an autocomplete question using legacy SDS to new SDS.
- Navigate to Projects.
- Select a survey using the legacy Supplemental Data Source in an autocomplete question.
Tip: Use the search field to find impacted projects. You can enter the survey name or search by survey ID.
- Notice the banner at the top of the survey describing the change. Selecting these questions will show you which questions are using legacy supplemental data sources. Selecting a question ID will automatically select that question within your survey.
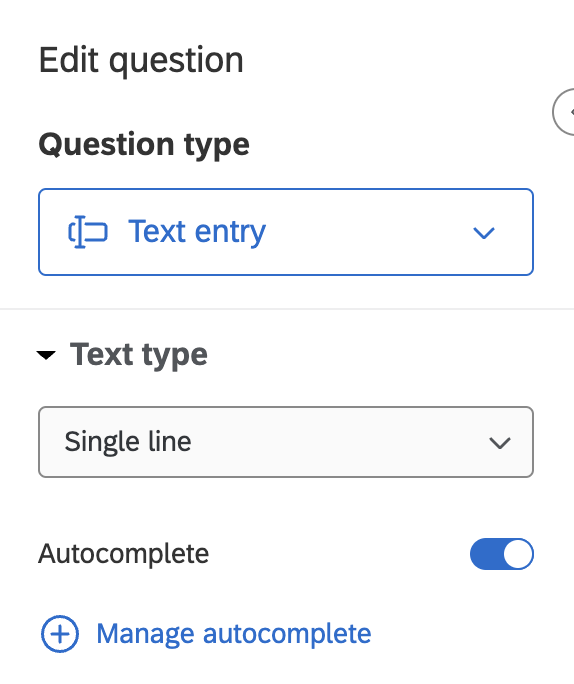
- In the sidebar, select Manage autocomplete.
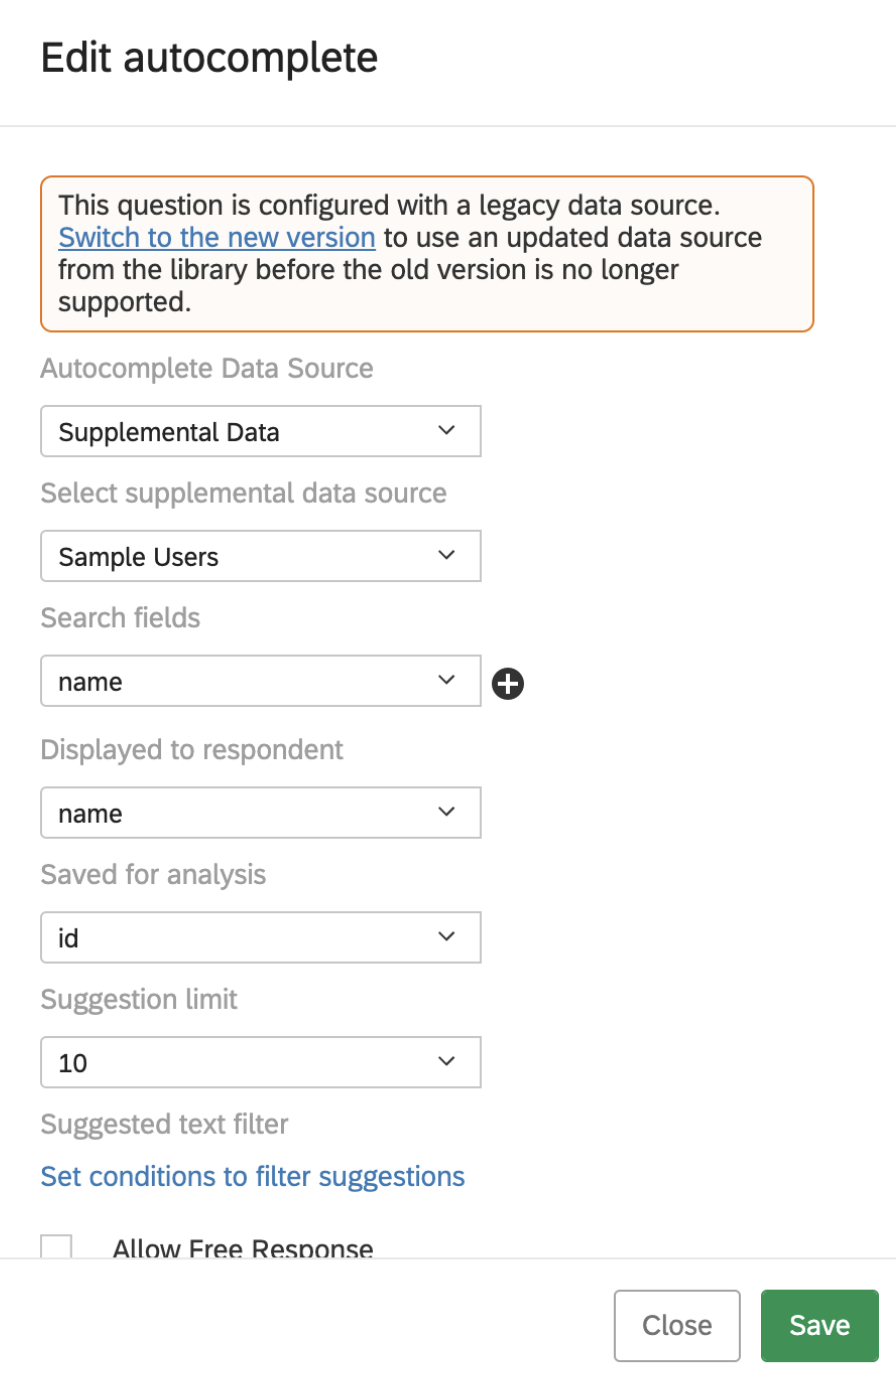
- Notice the banner describing the change and select Switch to the new version.
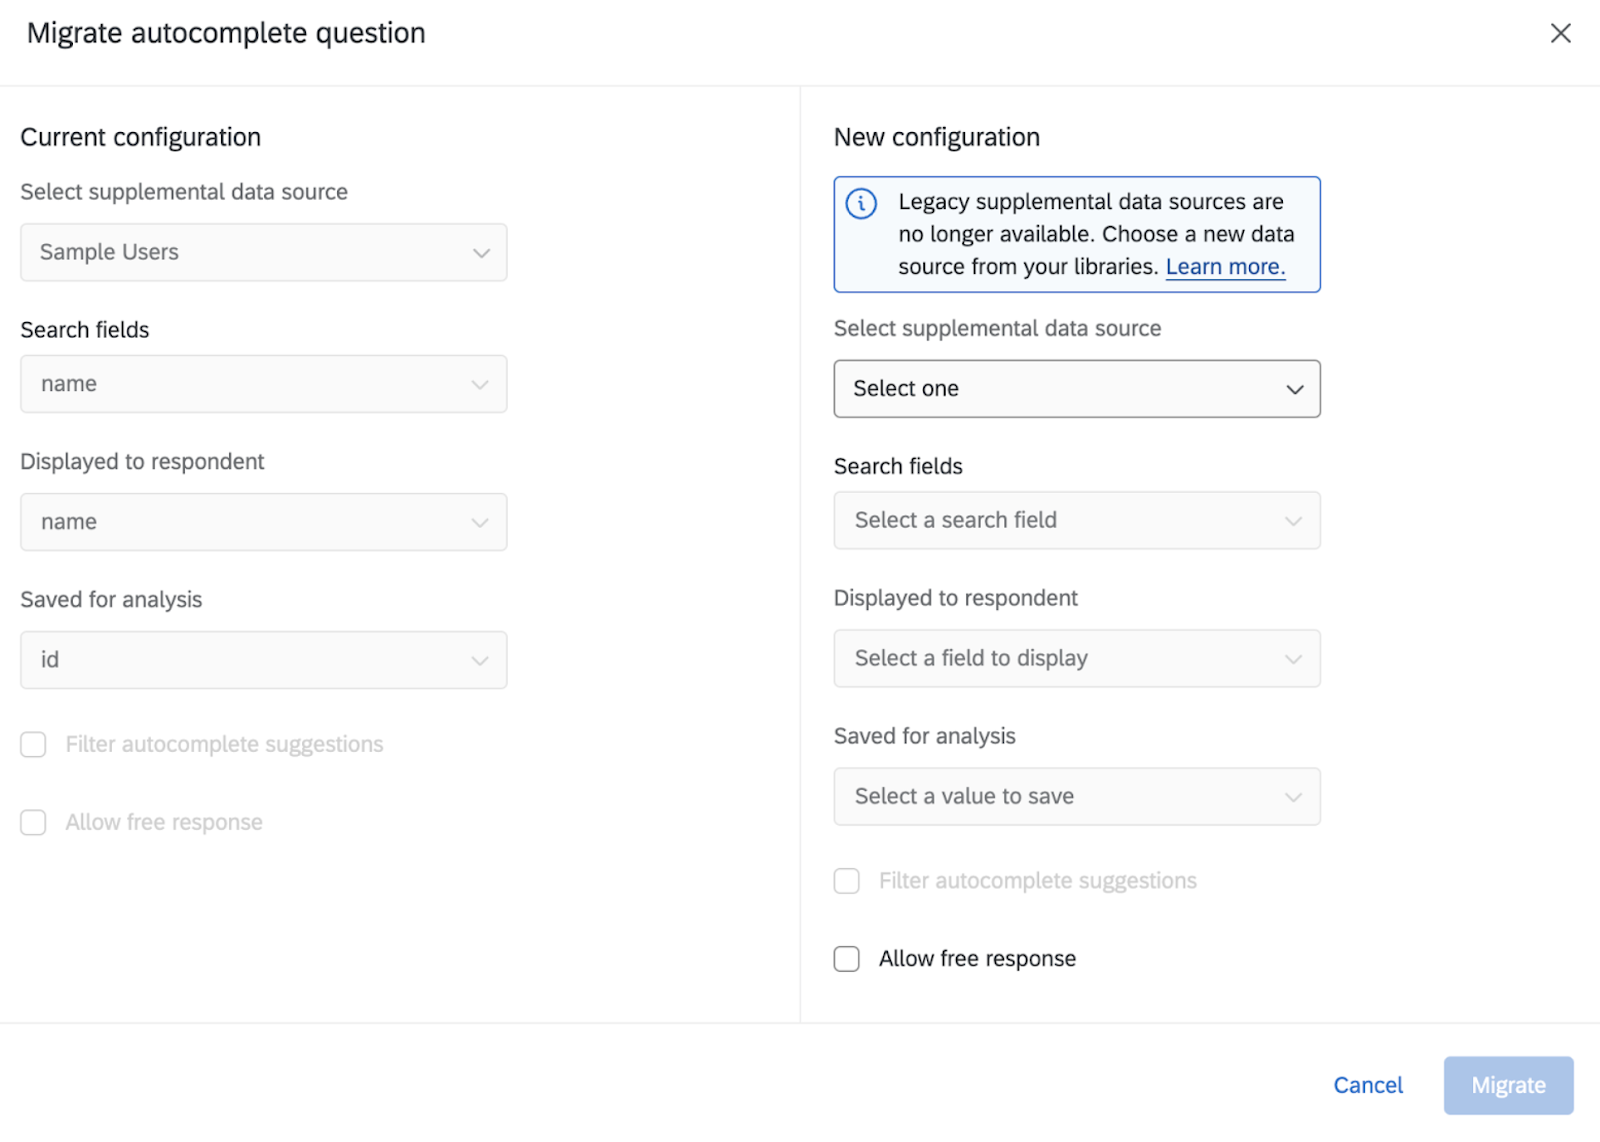
- A split view will be presented to aid in migrating legacy autocomplete configuration. On the left, is a read-only view of the existing configuration. On the right, is the new configuration.
- Select the supplemental data source you migrated earlier that mirrors the legacy one. If you want the same behavior, select the same configuration options. In our example below, we have a new source that is named the same and has all the same fields as the legacy source. When you are finished, select Migrate and your new configuration will be saved.
- You can verify that you have finished migrating all your questions once the banner at the top of your survey from step (3) is no longer showing.
- Preview the survey and verify everything works as you expect.
- Publish the updated survey.

Migrate Lookup Task in Workflows
Note: If you don’t have existing workflows that use the Lookup Task, there is no action required.
If you do currently have workflows that use the Lookup Task, the following actions are required. The migration of existing Lookup Task instances in live production workflows involves two key steps:
- Update the Lookup Task configuration to point to the new v2SDS tables.
- Update piped text names in workflow conditions and tasks consuming the piped text exports generated by the Lookup Task.
Before completing each of the above steps, you will first need to follow the instructions above for creating the new SDS in Library and Enabling Permissions for SDS. After this is completed, you can proceed with completing the steps above using the instructions below.
Update the Lookup Task configuration to point to the new v2SDS tables
For each existing workflow that contains the Lookup Task, you will need to update the Lookup Task configuration to point to the new SDS source instead of the legacy Imported Data Project or Survey Project where the lookup data was previously stored. Follow the procedure below to update your Lookup Task configuration to work with new SDS sources you created in previous steps above.
Tip: Alternatively, you can make a copy of an existing workflow that includes the Lookup Task and then update the task configuration in the new copy followed by testing it. After all looks good, you would then disable the original workflow that has the old configuration and start running the new workflow you created by copying.
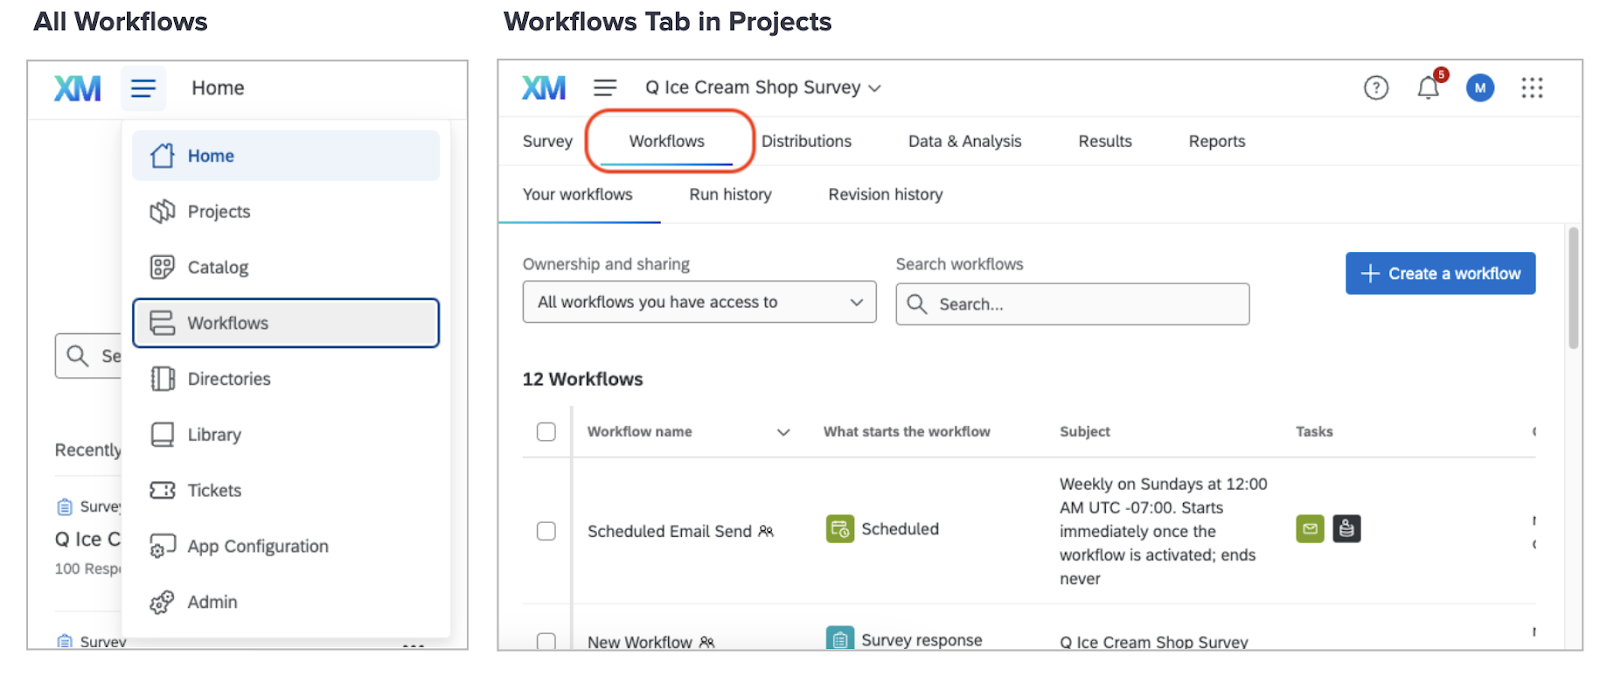
- Navigate to a workflow that includes an instance of the Lookup Task. Workflows can be located in a Project’s Workflows tab or in the Stand-alone Workflows location.
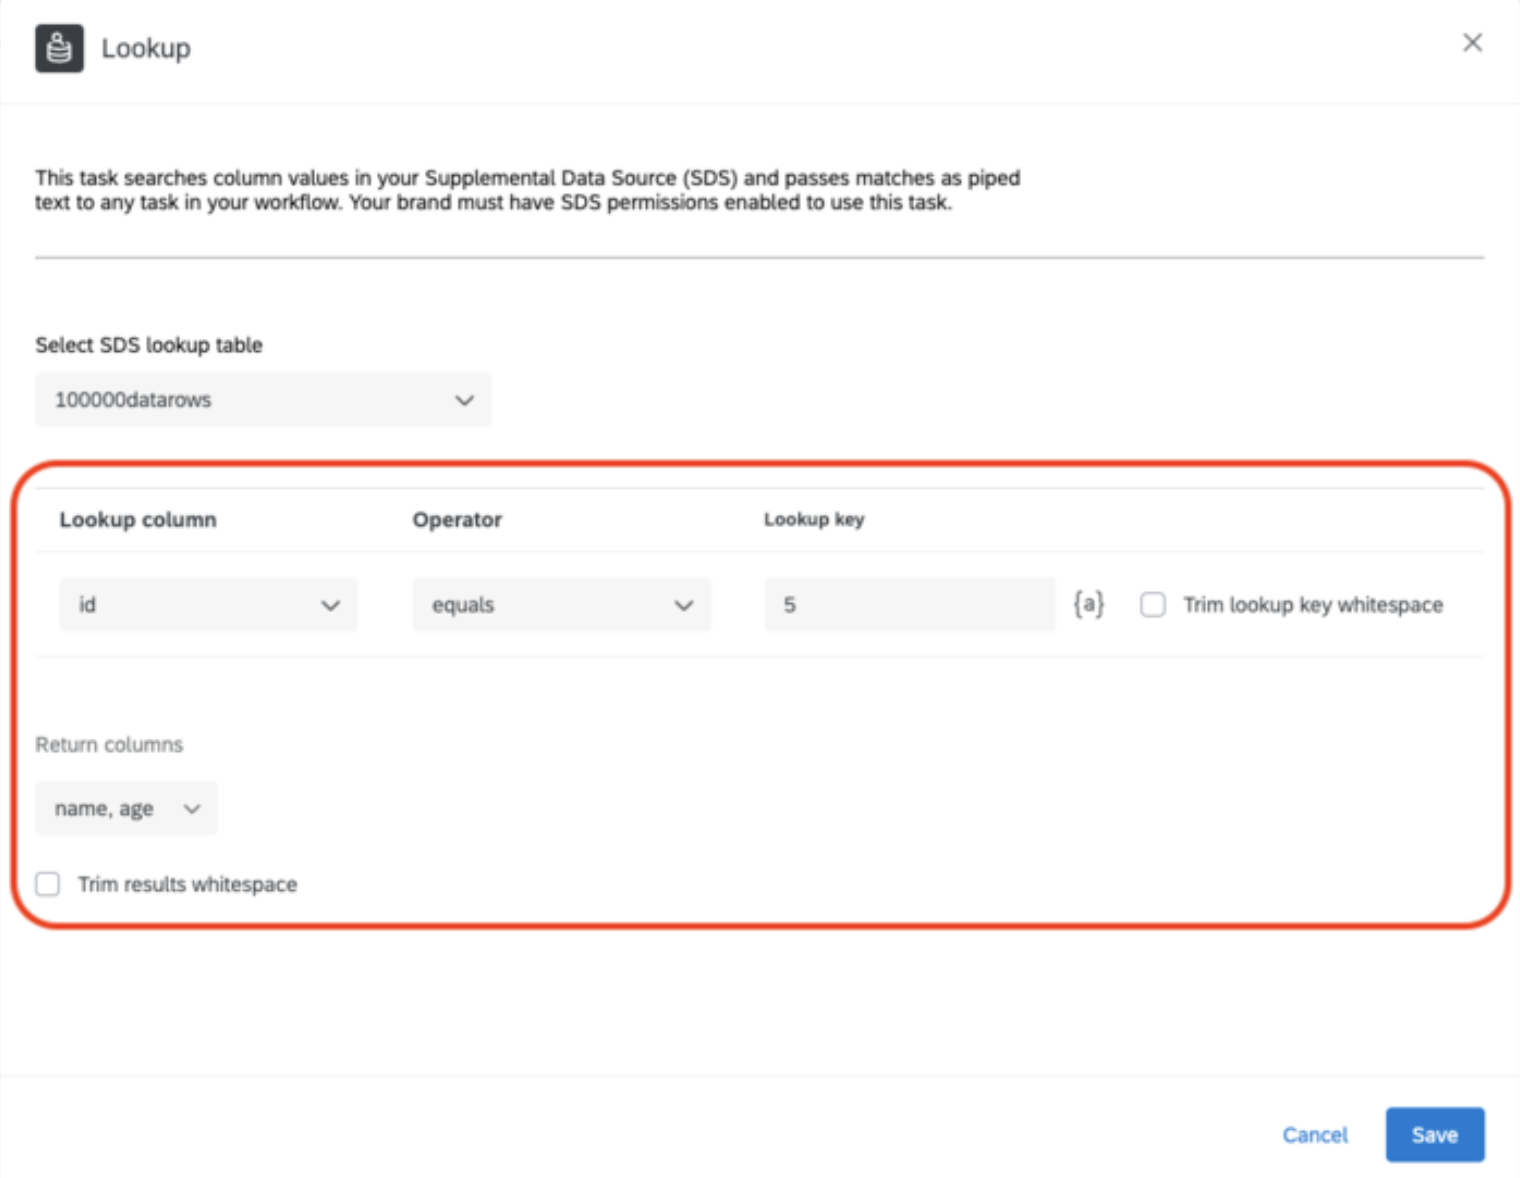
- Open the editor view for the workflow that contains the Lookup Task and then click on the Lookup Task to access the configuration field that allows you to set the source where the lookup data is stored and the search query details.
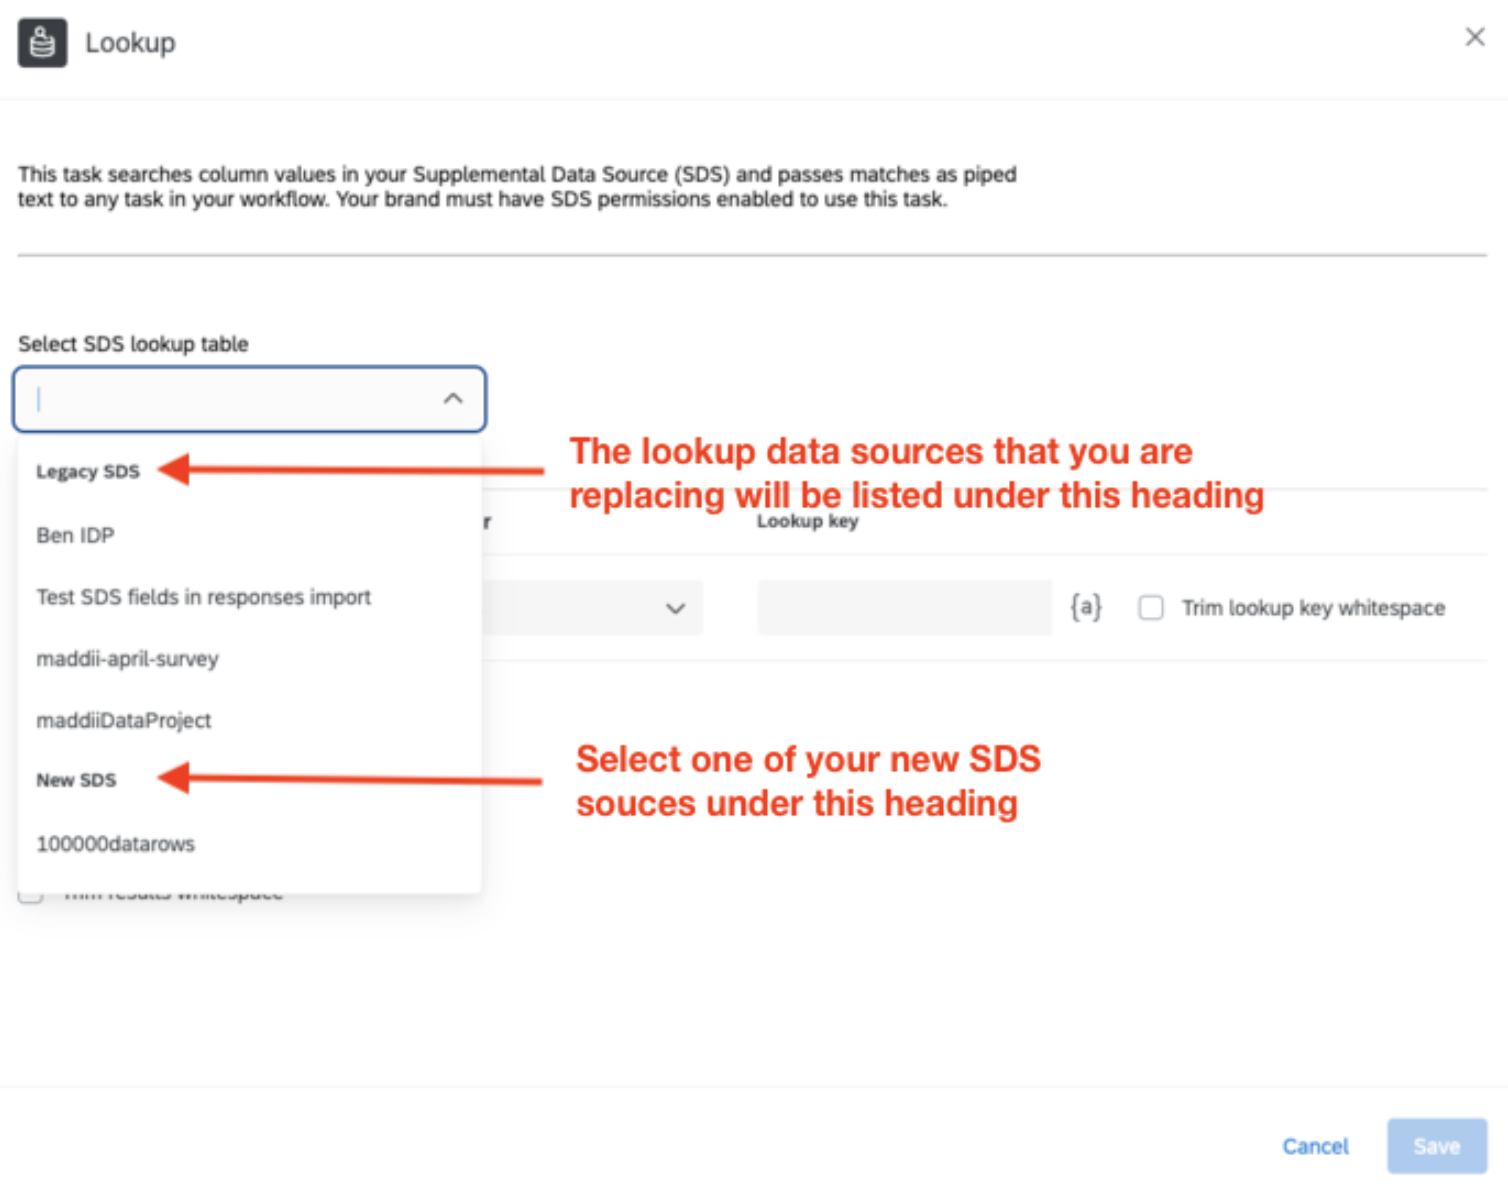
- Modify the ‘Select SDS lookup table’ field to point to your new SDS in the dropdown.
- Review the search query configuration fields to make sure they are set to the correct columns in your SDS source and are using the correct query operator and lookup key. After you’ve completed this, save and close the Lookup Task.
- Finally, test the workflow to make sure the Lookup Task can access and query the new SDS source. If you created a new workflow by copying your original that includes the old configuration for Lookup Task, make sure and disable the original workflow so it does not keep running and encountering errors when the legacy SDS sources are turned off.
Update the piped text in workflow conditions and subsequent tasks that reference the Lookup Task exports
When the Lookup Task runs, it generates piped text variables that can be referenced and used in subsequent conditions and task configurations. The migration to the new v2 SDS tables to store the lookup data will change the piped text variable names generated by the Lookup Task. For example, piped text names generated by the Lookup Task using the legacy IDP/v1SDS include a column number (example: ~{ch://OCAC_rpqQqC7eakALoBL/00001}) whereas newly generated exports using v2 SDS as the lookup data table include the column name instead (example: ~{ch://OCAC_rpqQqC7eakALoBL/age}). If you currently have workflows with tasks or conditions that reference the piped text exports generated by the Lookup Task, you will need to update these to use the new name that includes the v2 SDS column names. Please watch the demo video here that demonstrates an example of updating piped text references that depend on the Lookup Task.
Automatic Updates
SDS sources can receive automatic updates via Workflows using the new Load to SDS Task. For example, you may want to regularly sync a file from an SFTP server or Google Drive. Prior to performing the below steps to update an SDS source, you need to create an SDS source in the Library, following the steps above.
Note: The Load to SDS workflow task is in Preview and available upon request for existing SDS customers.
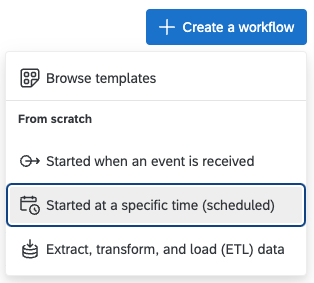
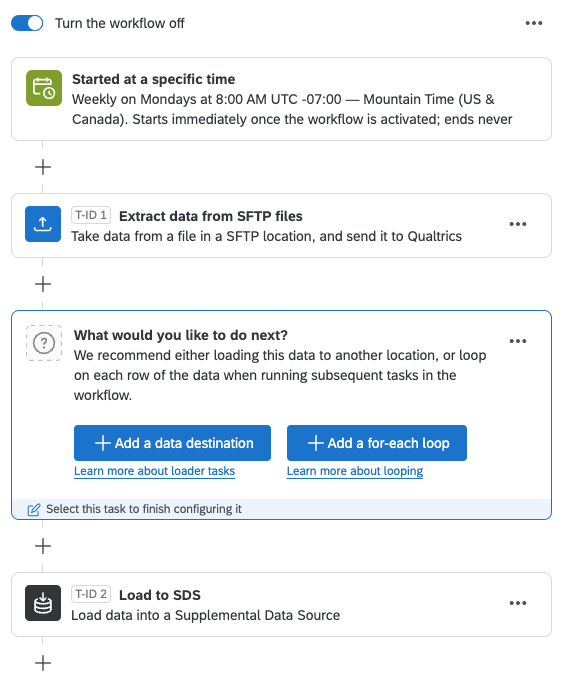
- Navigate to Workflows.
- Select Create a workflow → Started at a specific time (scheduled).
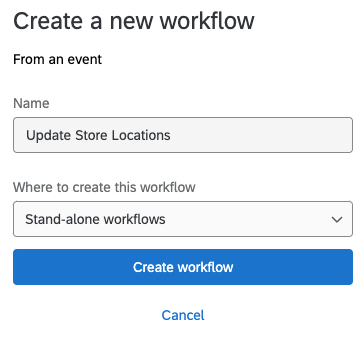
- Provide an appropriate Name and select Stand-alone workflows.
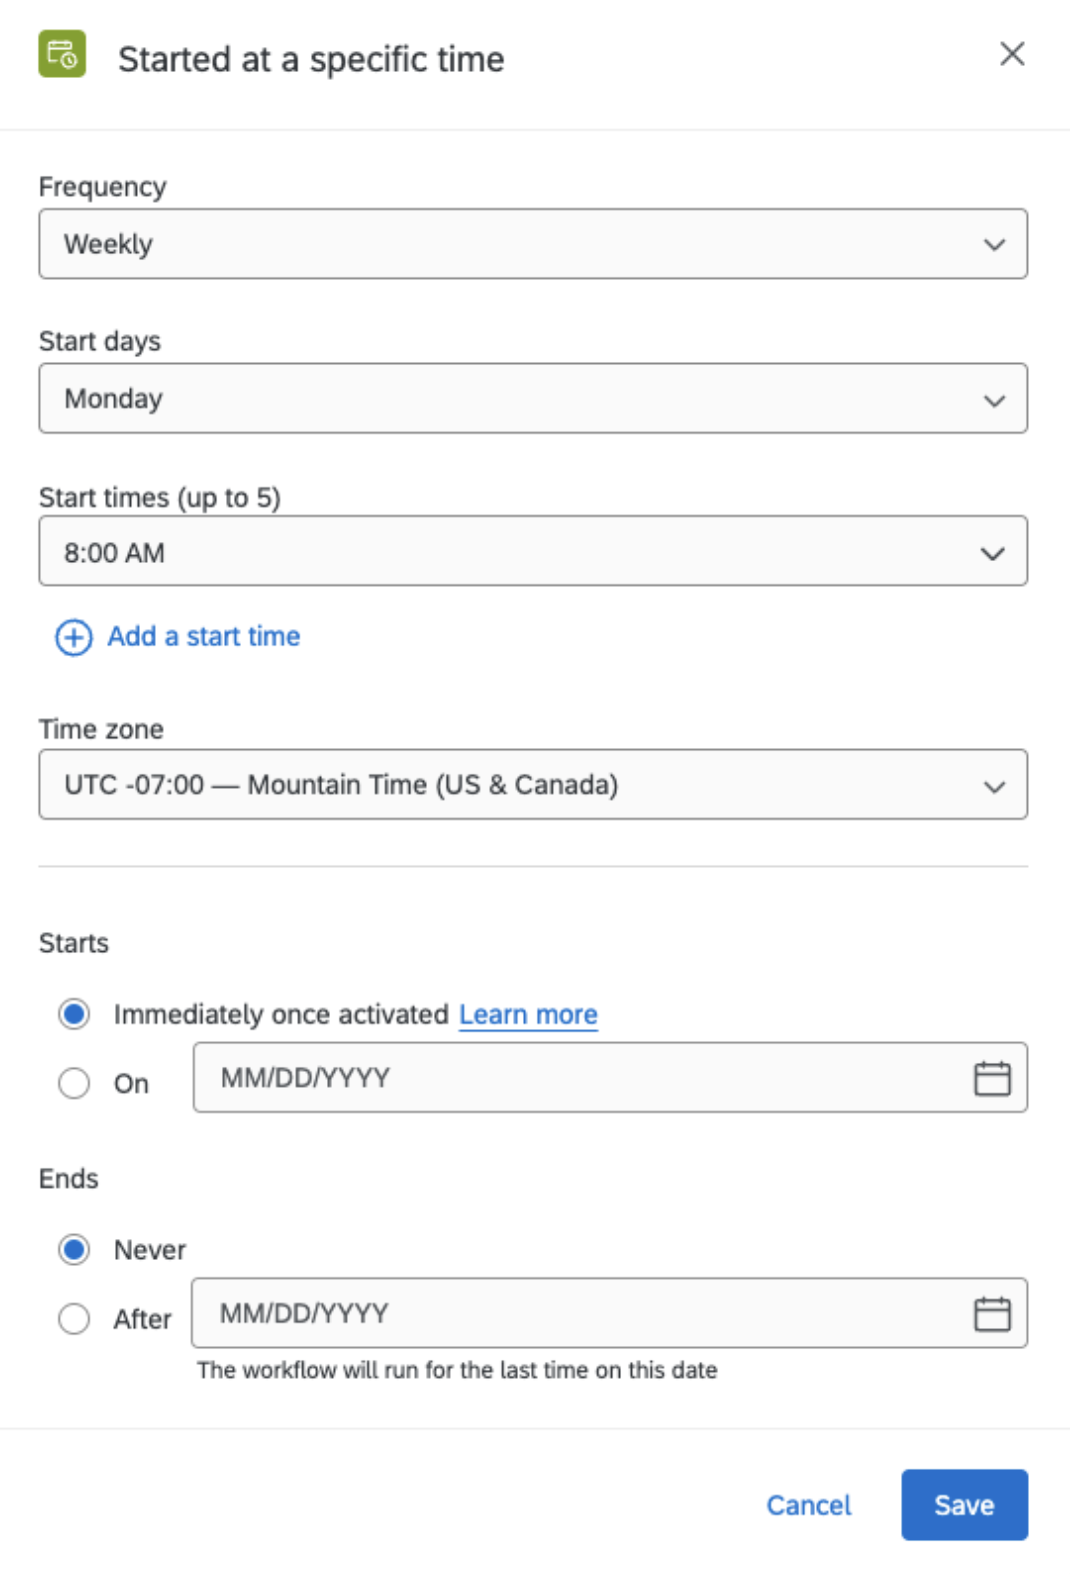
- Specify how often you would like to update the SDS source. In the example below, the schedule is set to update weekly on Mondays.
Note: The Load to SDS workflow task is restricted to run at most one time every 24 hours. We recommend scheduling your workflow to run no more than daily.
- Below the schedule select + → Add a task.
- The first task should typically be an extractor task to get the data you want to update your SDS with (see available extractor tasks) When selecting an extractor task, it is important to recall that the data you extract will overwrite the prior SDS data (not append). Many extractor tasks allow you to export all data, but if you select a file that only contains new additions (such as Extract responses from survey), your new source will only contain these new additions and not the original data. For this example, we will use the Extract data from SFTP files.
- Fill out the form for the task.
- Below the extraction task, select + → Add a task.
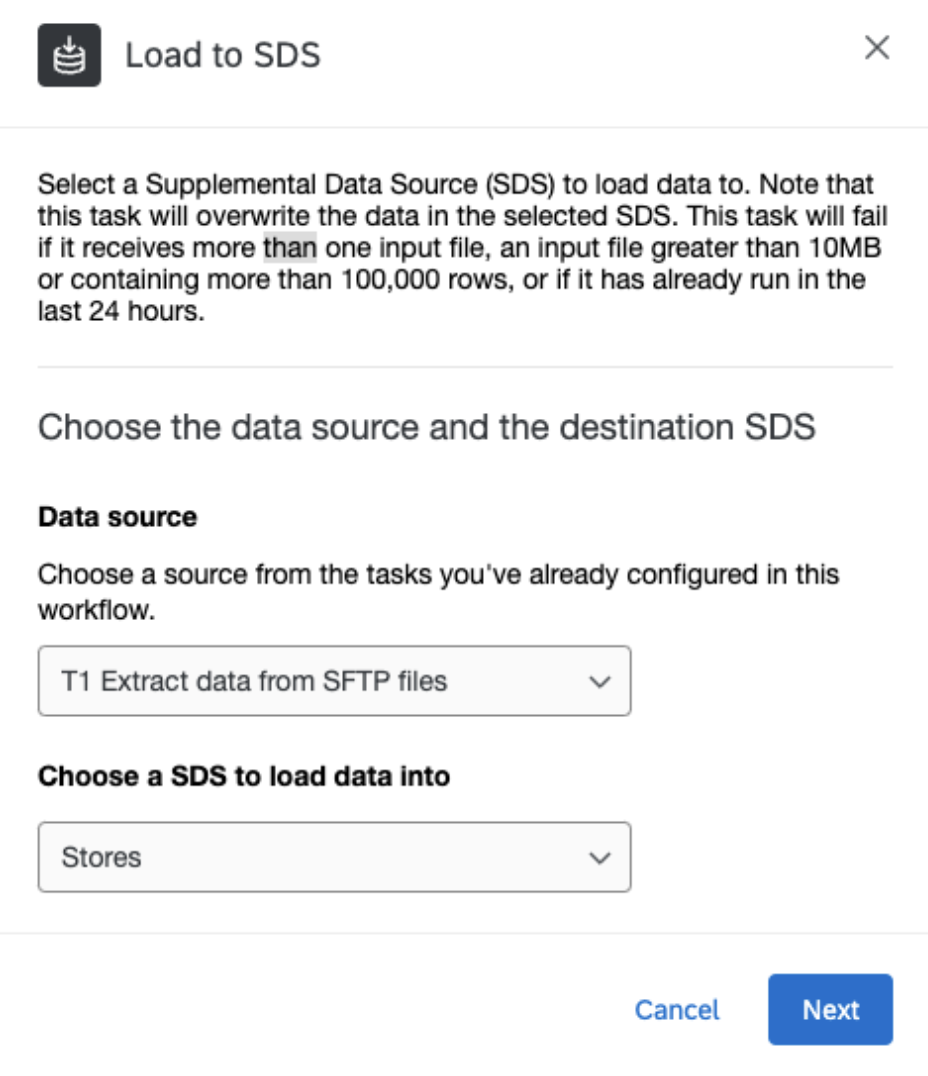
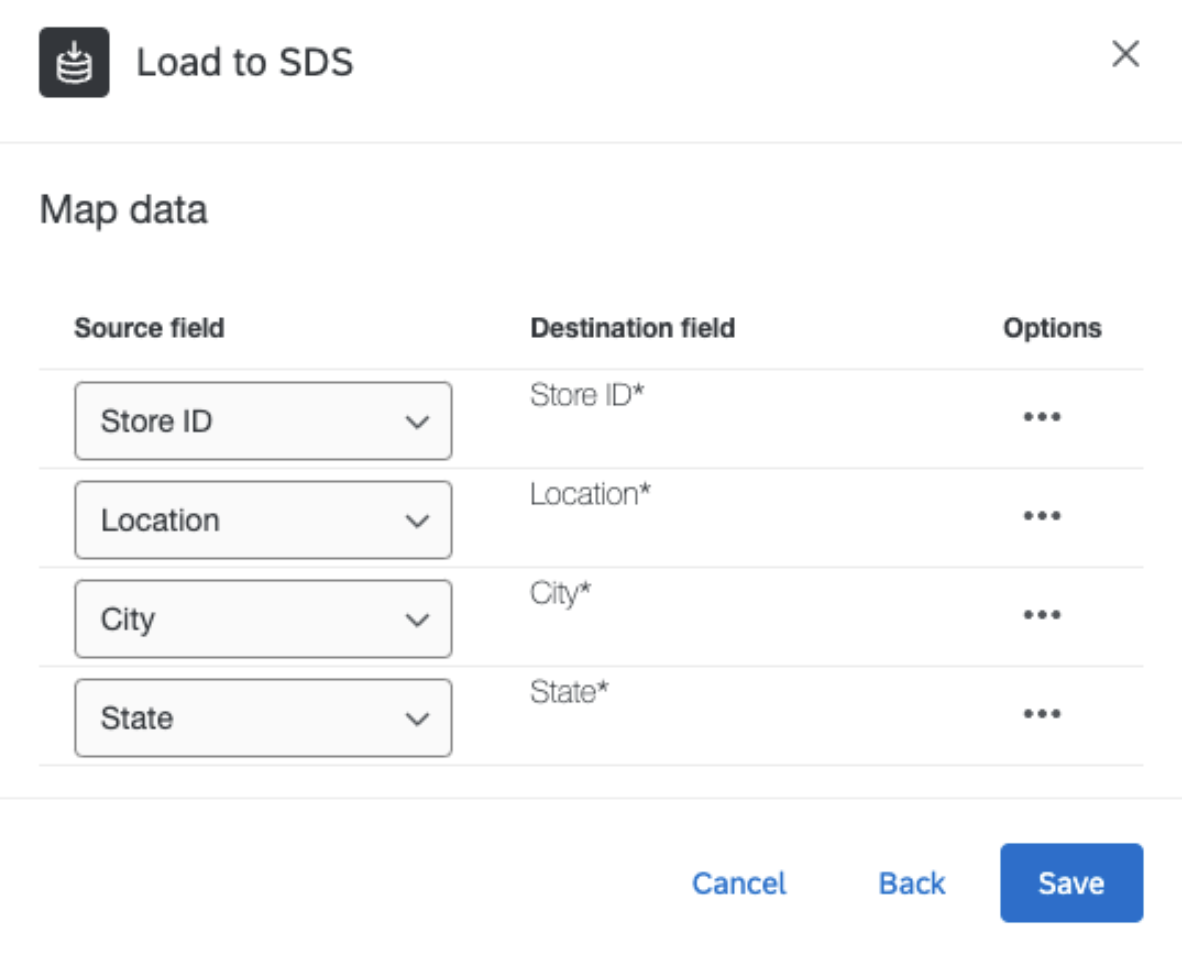
- Select the Load to SDS task.
- Select the data source for the task. This is going to be the extraction task we set up earlier. Then select the SDS source we want to overwrite with the data from the extraction task.
- Select the fields you want to map from the extraction task file to the SDS source. These will typically be the same unless the datasets differ (for example, the SFTP file may exceed the SDS limit of 30 columns and you would need to select just the columns you want to update the SDS source with).
- Select Turn the workflow on.
- Your workflow will then look something like this:
- You are all set! Your SDS source will now be updated weekly with the data from your SFTP file.