Change Answer Colors | XM Community
Skip to main content
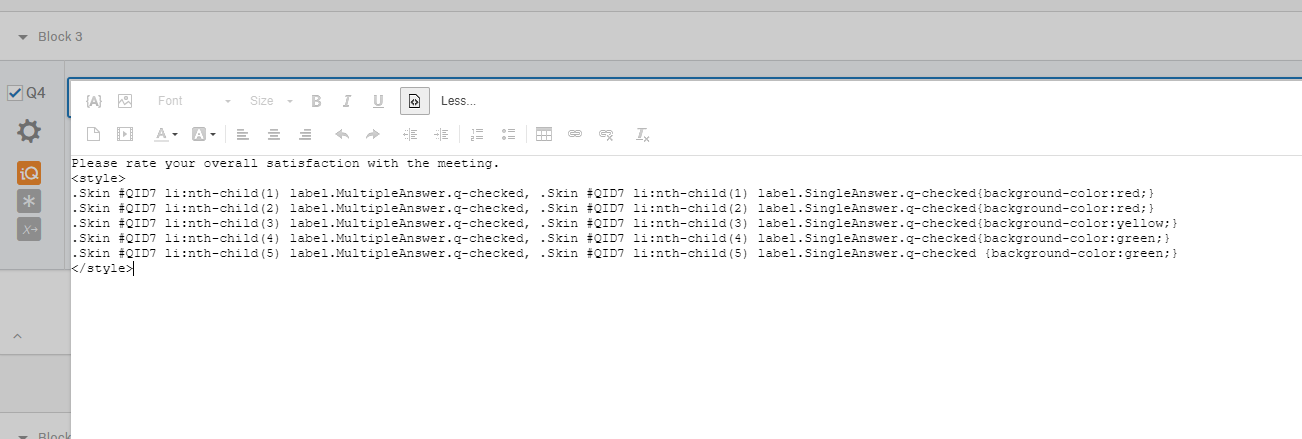
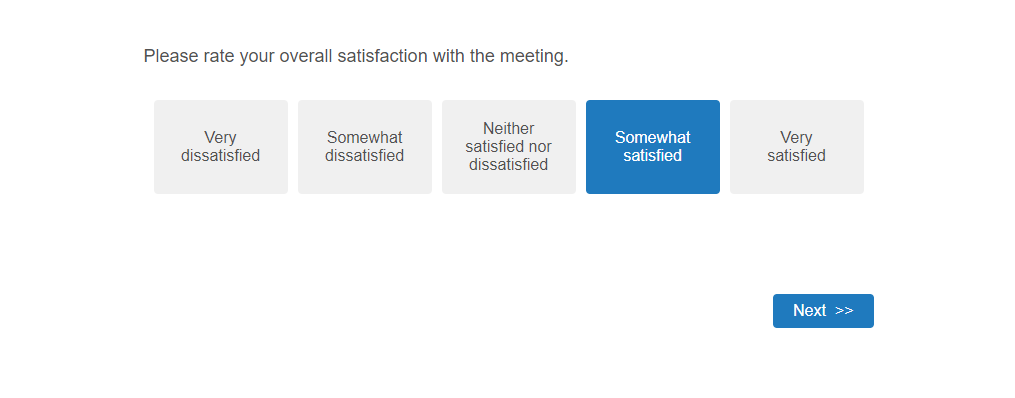
I'm trying to change the colors of a likert scale so that if they select a dissatisfied option, it turns red, satisfied green, etc.. But I'm having trouble getting it to work. I'm still trying to learn some of this so I'm a little lost! Here's what I have so far:


```<style>

.Skin #QID7.li:nth-child(1) label.MultipleAnswer.q-checked, .Skin #QID7.li:nth-child(1) label.SingleAnswer.q-checked{background-color:red;}

.Skin #QID7.li:nth-child(2) label.MultipleAnswer.q-checked, .Skin #QID7.li:nth-child(2) label.SingleAnswer.q-checked{background-color:red;}

.Skin #QID7.li:nth-child(3) label.MultipleAnswer.q-checked, .Skin #QID7.li:nth-child(3) label.SingleAnswer.q-checked{background-color:yellow;}

.Skin #QID7.li:nth-child(4) label.MultipleAnswer.q-checked, .Skin #QID7.li:nth-child(4) label.SingleAnswer.q-checked{background-color:green;}

.Skin #QID7.li:nth-child(5) label.MultipleAnswer.q-checked, .Skin #QID7.li:nth-child(5) label.SingleAnswer.q-checked {background-color:green;}

</style>```


But what is really weird: The first question in my survey flashes the colors I have identified when you hit "Next"- but the question I WANT the colors to go on to does nothing at all. So I'm doing _something_ but it's not the something I want to be happening. The issue appears to be with the question ID, and with when the action occurs.


Apprechaite the help!
@Kate,


For starters, you need a space instead of a period between #QID7 and li.
Thanks, @TomG! Removed. But still testing the same described expereince.
@Kate,


This works:

```

Click to write the question text

<style>

.Skin #QID1 li:nth-child(1) label.MultipleAnswer.q-checked, .Skin #QID1 li:nth-child(1) label.SingleAnswer.q-checked{background-color:red;}

.Skin #QID1 li:nth-child(2) label.MultipleAnswer.q-checked, .Skin #QID1 li:nth-child(2) label.SingleAnswer.q-checked{background-color:red;}

.Skin #QID1 li:nth-child(3) label.MultipleAnswer.q-checked, .Skin #QID1 li:nth-child(3) label.SingleAnswer.q-checked{background-color:yellow;}

.Skin #QID1 li:nth-child(4) label.MultipleAnswer.q-checked, .Skin #QID1 li:nth-child(4) label.SingleAnswer.q-checked{background-color:green;}

.Skin #QID1 li:nth-child(5) label.MultipleAnswer.q-checked, .Skin #QID1 li:nth-child(5) label.SingleAnswer.q-checked {background-color:green;}

</style>

```

Example survey:

https://marketinview.ca1.qualtrics.com/jfe/preview/SV_1BKNhTUhnAlbojz?Q_SurveyVersionID=current&Q_CHL=preview
Thanks, @TomG But I still must be doing somrthing wrong. Am I placing it in the wrong area or something? It's still not working.


!


!
Kate,


When you put the question in horizontal mode, it changes the underlying html from an unordered list to a table. So, there are no `<li>` elements. Instead there are table elements. This CSS works when I change the demo survey to horizontal:

```

Click to write the question text

<style>

.Skin #QID1 tr td.LabelContainer:nth-child(1) label.MultipleAnswer.q-checked, .Skin #QID1 tr td.LabelContainer:nth-child(1) label.SingleAnswer.q-checked{background-color:red;}

.Skin #QID1 tr td.LabelContainer:nth-child(2) label.MultipleAnswer.q-checked, .Skin #QID1 tr td.LabelContainer:nth-child(2) label.SingleAnswer.q-checked{background-color:red;}

.Skin #QID1 tr td.LabelContainer:nth-child(3) label.MultipleAnswer.q-checked, .Skin #QID1 tr td.LabelContainer:nth-child(3) label.SingleAnswer.q-checked{background-color:yellow;}

.Skin #QID1 tr td.LabelContainer:nth-child(4) label.MultipleAnswer.q-checked, .Skin #QID1 tr td.LabelContainer:nth-child(4) label.SingleAnswer.q-checked{background-color:green;}

.Skin #QID1 tr td.LabelContainer:nth-child(5) label.MultipleAnswer.q-checked, .Skin #QID1 tr td.LabelContainer:nth-child(5) label.SingleAnswer.q-checked{background-color:green;}

</style>

```

Demo:

https://marketinview.ca1.qualtrics.com/jfe/preview/SV_1BKNhTUhnAlbojz?Q_SurveyVersionID=current&Q_CHL=preview
> @TomG said:

> @Kate,

>

> This works:

> ```

> Click to write the question text

> <style>

> .Skin #QID1 li:nth-child(1) label.MultipleAnswer.q-checked, .Skin #QID1 li:nth-child(1) label.SingleAnswer.q-checked{background-color:red;}

> .Skin #QID1 li:nth-child(2) label.MultipleAnswer.q-checked, .Skin #QID1 li:nth-child(2) label.SingleAnswer.q-checked{background-color:red;}

> .Skin #QID1 li:nth-child(3) label.MultipleAnswer.q-checked, .Skin #QID1 li:nth-child(3) label.SingleAnswer.q-checked{background-color:yellow;}

> .Skin #QID1 li:nth-child(4) label.MultipleAnswer.q-checked, .Skin #QID1 li:nth-child(4) label.SingleAnswer.q-checked{background-color:green;}

> .Skin #QID1 li:nth-child(5) label.MultipleAnswer.q-checked, .Skin #QID1 li:nth-child(5) label.SingleAnswer.q-checked {background-color:green;}

> </style>

> ```

> Example survey:

> https://marketinview.ca1.qualtrics.com/jfe/preview/SV_1BKNhTUhnAlbojz?Q_SurveyVersionID=current&Q_CHL=preview


Hi Kate,


The above code will be applicable to Options where Position is set to Vertical. As per your screenshot it seems that your Options Position is set to Horizontal. You can use the following code for Horizontal Aligned options:


.Skin #QID7 td:nth-child(1) label.SingleAnswer.q-checked, .Skin #QID7 td:nth-child(1) label.MultipleAnswer.q-checked{

background-color: green;

}

.Skin #QID7 td:nth-child(2) label.SingleAnswer.q-checked, .Skin #QID7 td:nth-child(2) label.MultipleAnswer.q-checked{

background-color: green;

}

.Skin #QID7 td:nth-child(3) label.SingleAnswer.q-checked, .Skin #QID7 td:nth-child(3) label.MultipleAnswer.q-checked{

background-color: yellow;

}

.Skin #QID7 td:nth-child(4) label.SingleAnswer.q-checked, .Skin #QID7 td:nth-child(4) label.MultipleAnswer.q-checked{

background-color: red;

}

.Skin #QID7 td:nth-child(5) label.SingleAnswer.q-checked, .Skin #QID7 td:nth-child(5) label.MultipleAnswer.q-checked{

background-color: red;

}


Here is the preview link for the same :

https://ugamsandbox.ca1.qualtrics.com/jfe/preview/SV_3axV8UiJR5YStG5?Q_SurveyVersionID=current&Q_CHL=preview
Amazing! Thank you, @TomG, Thank you @NiC

Leave a Reply