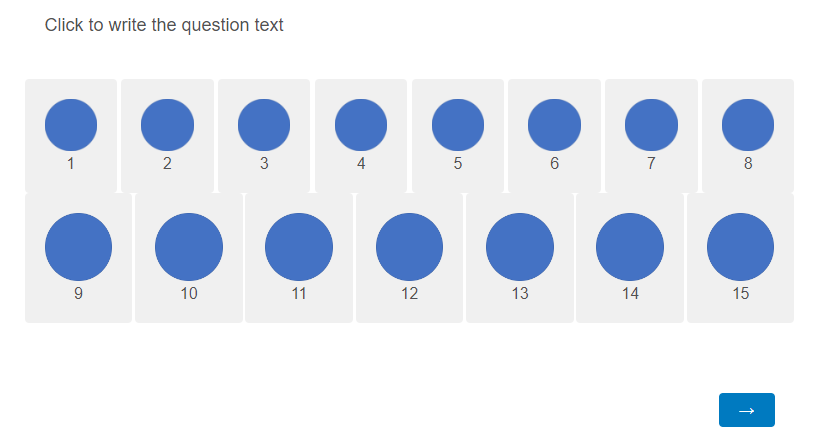
I have a multiple choice question with 15 pictures displayed as answers, in eight columns. By default, it shows like this, with an empty space at the end of the bottom ‘row’:
X X X X X X X X
X X X X X X X
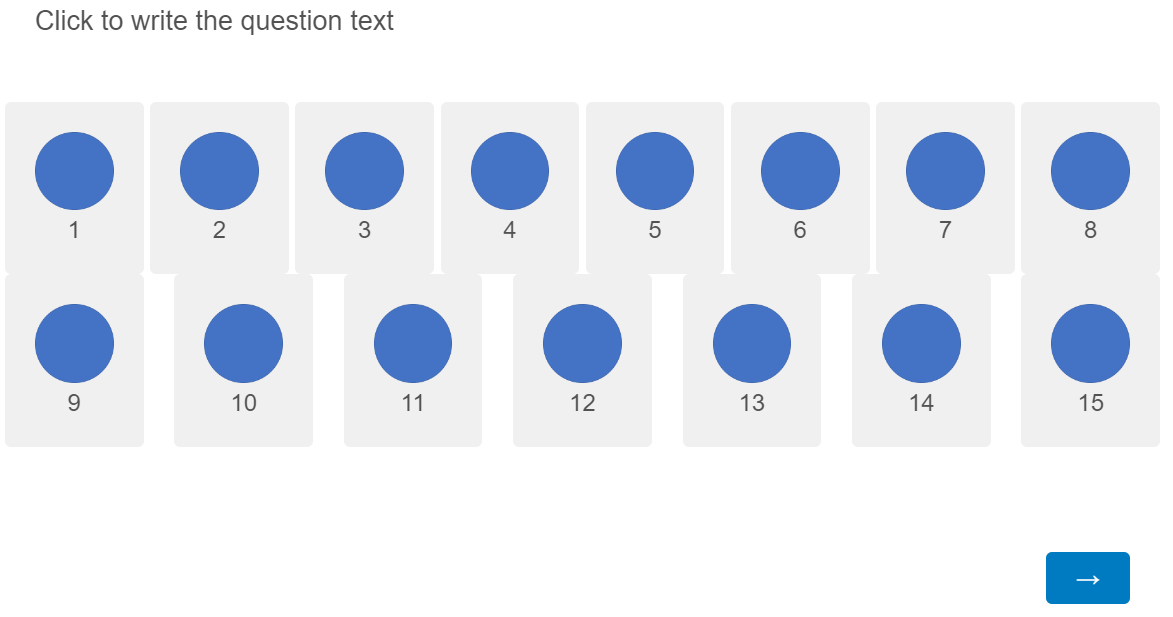
Is there any way to stagger the second question in each column, so that they display symmetrically, more like this?
X X X X X X X X
X X X X X X X
Thanks for any help :)
Best answer by Tom_1842
I'll give it a try. First create a Multiple Choice question with 15 options that has vertical alignment. Use the Rich Content Editor to add pictures to each answer option. Then, add the below to the OnReady section of the question's JavaScript:
var qid = this.questionId; var questionContainer = this.questionContainer;
//select answer choices// jQuery('#'+qid+' > div.Inner.BorderColor.SAVR > div > fieldset > div > ul > li:nth-child(1)').attr('id','opt1'); jQuery('#'+qid+' > div.Inner.BorderColor.SAVR > div > fieldset > div > ul > li:nth-child(2)').attr('id','opt2'); jQuery('#'+qid+' > div.Inner.BorderColor.SAVR > div > fieldset > div > ul > li:nth-child(3)').attr('id','opt3'); jQuery('#'+qid+' > div.Inner.BorderColor.SAVR > div > fieldset > div > ul > li:nth-child(4)').attr('id','opt4'); jQuery('#'+qid+' > div.Inner.BorderColor.SAVR > div > fieldset > div > ul > li:nth-child(5)').attr('id','opt5'); jQuery('#'+qid+' > div.Inner.BorderColor.SAVR > div > fieldset > div > ul > li:nth-child(6)').attr('id','opt6'); jQuery('#'+qid+' > div.Inner.BorderColor.SAVR > div > fieldset > div > ul > li:nth-child(7)').attr('id','opt7'); jQuery('#'+qid+' > div.Inner.BorderColor.SAVR > div > fieldset > div > ul > li:nth-child(8)').attr('id','opt8'); jQuery('#'+qid+' > div.Inner.BorderColor.SAVR > div > fieldset > div > ul > li:nth-child(9)').attr('id','opt9'); jQuery('#'+qid+' > div.Inner.BorderColor.SAVR > div > fieldset > div > ul > li:nth-child(10)').attr('id','opt10'); jQuery('#'+qid+' > div.Inner.BorderColor.SAVR > div > fieldset > div > ul > li:nth-child(11)').attr('id','opt11'); jQuery('#'+qid+' > div.Inner.BorderColor.SAVR > div > fieldset > div > ul > li:nth-child(12)').attr('id','opt12'); jQuery('#'+qid+' > div.Inner.BorderColor.SAVR > div > fieldset > div > ul > li:nth-child(13)').attr('id','opt13'); jQuery('#'+qid+' > div.Inner.BorderColor.SAVR > div > fieldset > div > ul > li:nth-child(14)').attr('id','opt14'); jQuery('#'+qid+' > div.Inner.BorderColor.SAVR > div > fieldset > div > ul > li:nth-child(15)').attr('id','opt15');
you can control the layout of your multiple choice question with pictures using CSS styling. To stagger the second question in each column, you can add custom CSS code to adjust the positioning of the elements.
you can use following CSS code:
/* Adjust the margins for the second question in each column */ .question-choice-list .q-checkbox:nth-child(8n+2), .question-choice-list .q-checkbox:nth-child(8n+4), .question-choice-list .q-checkbox:nth-child(8n+6) { margin-left: 20px; /* You can adjust the margin as needed */ }
Thanks for the response, @Qual.78500 . I’ve entered the code into the custom CSS section of the Look & Feel tab but it doesn’t seem to change anything. Because I just want to use the multiple choice format to display the pictures in a random order, I’ve used javascript to remove checkboxes and make the pictures unselectable. Do you think that could be interfering with the code? Do you have any more advice?
I'll give it a try. First create a Multiple Choice question with 15 options that has vertical alignment. Use the Rich Content Editor to add pictures to each answer option. Then, add the below to the OnReady section of the question's JavaScript:
var qid = this.questionId; var questionContainer = this.questionContainer;
//select answer choices// jQuery('#'+qid+' > div.Inner.BorderColor.SAVR > div > fieldset > div > ul > li:nth-child(1)').attr('id','opt1'); jQuery('#'+qid+' > div.Inner.BorderColor.SAVR > div > fieldset > div > ul > li:nth-child(2)').attr('id','opt2'); jQuery('#'+qid+' > div.Inner.BorderColor.SAVR > div > fieldset > div > ul > li:nth-child(3)').attr('id','opt3'); jQuery('#'+qid+' > div.Inner.BorderColor.SAVR > div > fieldset > div > ul > li:nth-child(4)').attr('id','opt4'); jQuery('#'+qid+' > div.Inner.BorderColor.SAVR > div > fieldset > div > ul > li:nth-child(5)').attr('id','opt5'); jQuery('#'+qid+' > div.Inner.BorderColor.SAVR > div > fieldset > div > ul > li:nth-child(6)').attr('id','opt6'); jQuery('#'+qid+' > div.Inner.BorderColor.SAVR > div > fieldset > div > ul > li:nth-child(7)').attr('id','opt7'); jQuery('#'+qid+' > div.Inner.BorderColor.SAVR > div > fieldset > div > ul > li:nth-child(8)').attr('id','opt8'); jQuery('#'+qid+' > div.Inner.BorderColor.SAVR > div > fieldset > div > ul > li:nth-child(9)').attr('id','opt9'); jQuery('#'+qid+' > div.Inner.BorderColor.SAVR > div > fieldset > div > ul > li:nth-child(10)').attr('id','opt10'); jQuery('#'+qid+' > div.Inner.BorderColor.SAVR > div > fieldset > div > ul > li:nth-child(11)').attr('id','opt11'); jQuery('#'+qid+' > div.Inner.BorderColor.SAVR > div > fieldset > div > ul > li:nth-child(12)').attr('id','opt12'); jQuery('#'+qid+' > div.Inner.BorderColor.SAVR > div > fieldset > div > ul > li:nth-child(13)').attr('id','opt13'); jQuery('#'+qid+' > div.Inner.BorderColor.SAVR > div > fieldset > div > ul > li:nth-child(14)').attr('id','opt14'); jQuery('#'+qid+' > div.Inner.BorderColor.SAVR > div > fieldset > div > ul > li:nth-child(15)').attr('id','opt15');
@Tom_1842 , woah! That’s amazing. Thanks so much. I’d mark yours as the best answer but I’d already marked the other Tom’s and I’m not sure how to change it…